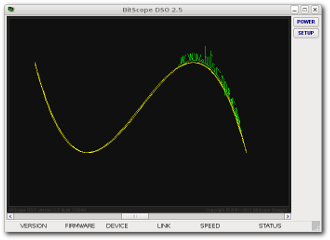
When the DSO first runs it displays an animated lissajous figure and two buttons:
| BUTTON | DESCRIPTION |
| POWER | Start BitScope DSO. |
| SETUP | Configuration Setup. |
Click POWER to open the connection to BitScope and start using the DSO. If only one BitScope is plugged into the PC there is no need to click SETUP.
If the BitScope is not locally connected (via USB or a local LAN) or if more than one BitScope is available, DSO SETUP is required tell DSO which BitScope to use.
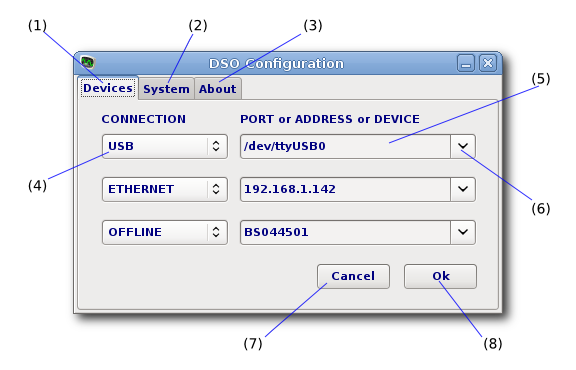
Clicking SETUP opens the setup dialog box:

| ID | FEATURE | DESCRIPTION |
| (1) | Devices Page | Selects BitScope connection preferences. |
| (2) | System Page | Configures various system defaults for BitScope DSO. |
| (3) | About Page | Some information about the DSO and its authors. |
| (4) | Connection Method | Specifies how to connect with BitScope. |
| (5) | Device Selection | Specifies the port, address or ID of BitScope. |
| (6) | Device Menu | Shows a menu of possible alternative connections. |
| (7) | Cancel Changes | Close SETUP without making any changes. |
| (8) | Accept Changes | Close SETUP saving any changes. |
The dialog works the same way regardless of whether DSO is running on Windows, Mac OSX or Linux systems but the names of the devices listed may be different.
Four connection methods are supported and up to three connections may be specified in decending priority order via the SETUP.
| NAME | DESCRIPTION |
| USB | Local, connected via USB. |
| SERIAL | Local, connected via a Serial Port. |
| ETHERNET | Local or remote, connected via LAN. |
| OFFLINE | Emulated device, no connection. |
Connection Methods
A USB BitScope will automatically appear as the first device (i.e. /dev/ttyUSB0 in the example above). If more than one BitScope is plugged into the PC, choose which one you want (6) or type in the device name (5) directly.
If you have a Network BitScope, choose the ETHERNET connection method and select from the menu or type in the IP address or its host name (on your LAN). If you don't have a BitScope you can still run DSO by choosing OFFLINE and specifying the BitScope model you want to emulate.
This is useful to replay previously recorded waveform data for offline analysis.
When the POWER button is pressed the device connections specified via SETUP are opened in decending order until a BitScope device is found or all connections have been attempted. If a device is already open and connected (e.g. by another DSO instance) it is skipped and the next one used. In this way two or three BitScopes may be used at once from a single PC. If no devices can be found the DSO defaults to OFFLINE REPLAY MODE which means the DSO is running but is not connected. A file dialog appears asking for a DDR file to play.
The lissajous display shown when the DSO is running but not "powered on" updates at about 20 fps and provides a handy performance test of your PC. If the lissajous updates much slower than this, or if your PC becomes sluggish when it is running, your PC or graphics card may need some tweaking to work well with DSO.
For a bit of fun, try moving the slider at the bottom of the screen :-)